1
User’s Guide
For Firmware 11.4.1 - 111422
Contents
CLICKCLICK to jump to section
or
Use CTRL + FCTRL + F (Windows) or ⌘⌘ + F + F
(MacOS) to searchto search the document
Feature List 2
• Vehicle Settings 2
• Live Functions 3
• Non- Menu Live Functions 4
Installation 5
Menu Navigation 5
CRITICAL INFORMATION 6
Returning to Stock (Unmarry) 6
Vehicle Settings 7
• Submenu Performance 7
• Submenu Tire 8
• Submenu Radio 8
• Submenu Lighting 8
• Submenu Off-Road 9
• Submenu Other 10
Live Menu 11
• Live Settings 11
Non-Menu Live Functions 11
Tazer PIN Lock Supplement 13
U p d a ti n g & L i g h t S h o w C o n g 1 4
Unmarrying Your Tazer 14
The Unmarry Key 14
Troubleshooting 15
The Tazer JL Mini is an electronic plug-
in device for the following vehicles:
2018-2023 Jeep Wrangler JL
2020-2023 Jeep Gladiator JT
2021-2023 Jeep Wrangler 4XE
Firmware Updates
New rmware is available periodically,
always free and posted to the
Z Automotive website. The Tazer may not
ship with the latest rmware, so use ZPU
(Z Automotive Programming Utility), also
on the website, to install the rmware
over USB.
Also compatible with
Jeep Gladiator JT
2
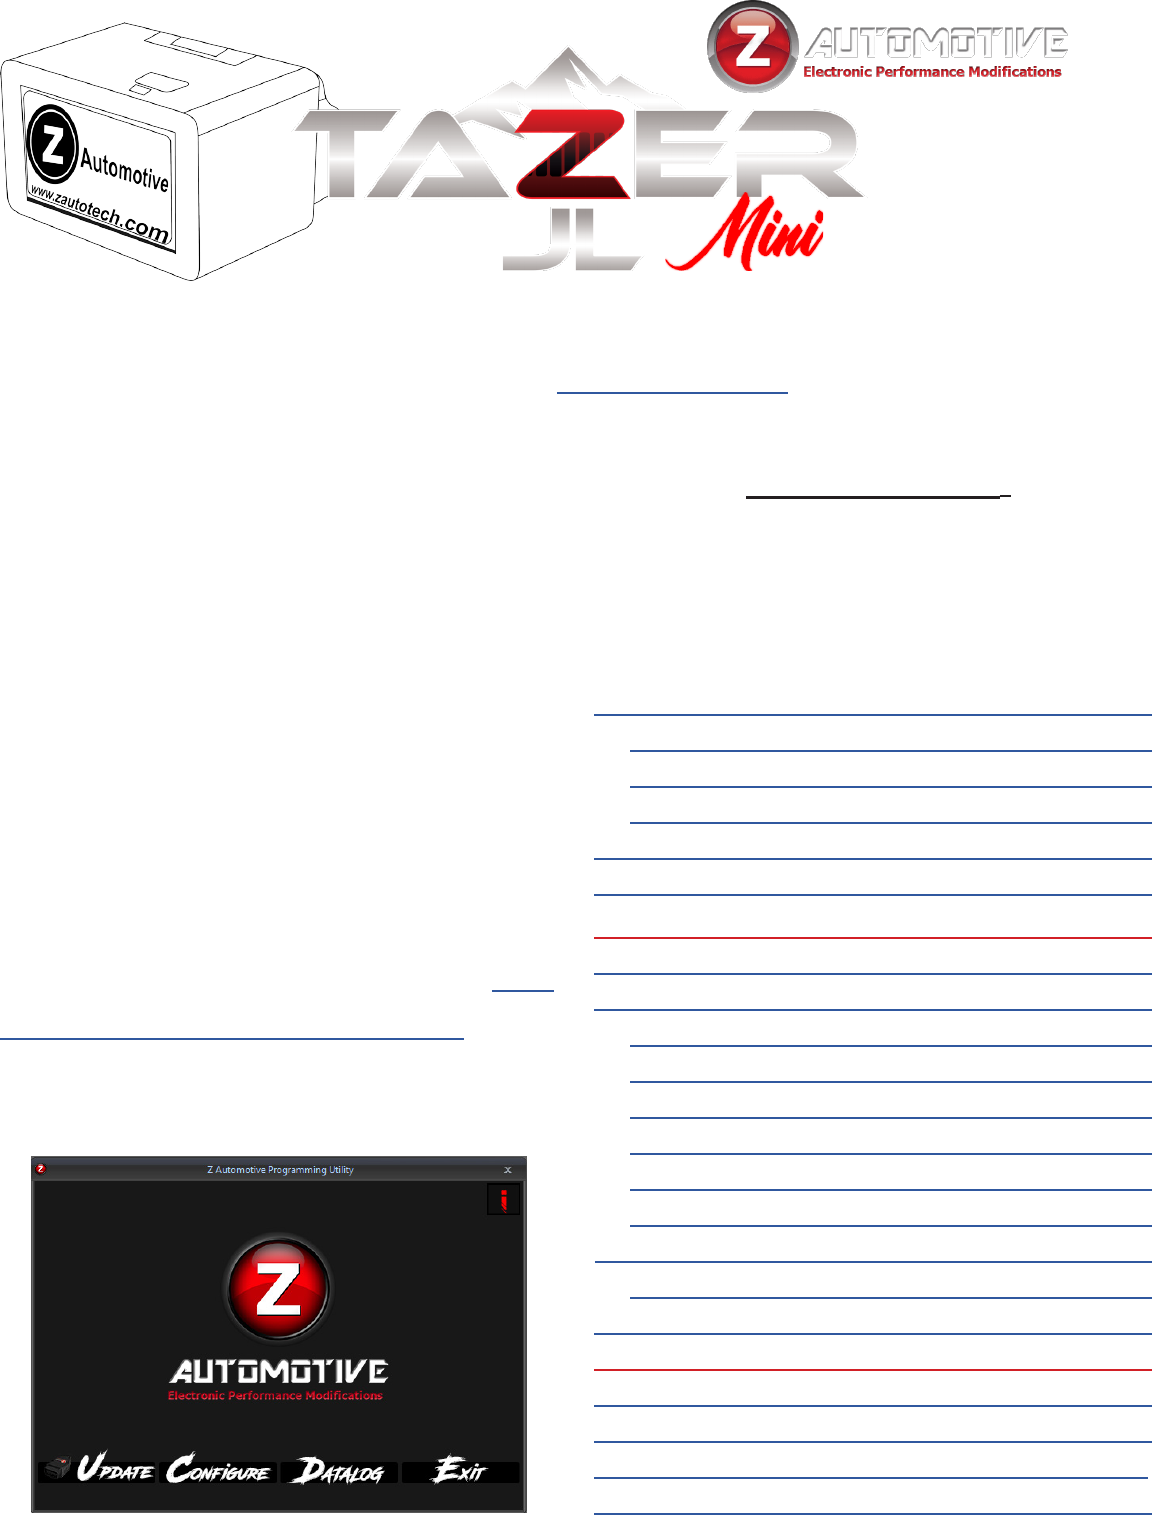
Feature List
Tazer JL Mini features can be broken into three categories:
• Vehicle Settings are accessed with the engine OFF and the ignition in the “RUN” position.
These are changes made to the Jeep such as tire size, gear ratios or settings which accommodate
other upgrades. These changes will continue to operate after the Tazer JL Mini is unplugged.
• Live Functions are accessed with the engine ONON. These are operations the Tazer JL Mini
performs live, only while it is physically connected.
• “Non-Menu” Live Functions are not located in a menu.are not located in a menu. They are activated automaticallyautomatically
or with a steering wheel button combinationbutton combination. These are operations the Tazer JL Mini performs live,
only while it is physically connected.
NOTE: This is just a list of available features. To learn more about how to
activate them or what they do, continue to the dedicated section of the
manual for each set of features.
List of Vehicle Settings
(ENGINE OFF, IGNITION IN “RUN”)
• “LightShow?” 6 preset and 3 make-your-own light shows
that ash all the exterior lights – perfect for car shows/
rst responders/off-road visibility – controlled from key
fob or steering wheel buttons – can be enabled in-
motion for use in parades, off-road and for legal police/
EMS applications (contact support for more info)
• “Read/Clear DTCs?” read and clear DTCs system-wide
or in specic modules
Submenus:
• “Perf?” PERFORMANCE SUBMENU
• “TPMS?” TPMS SUBMENU
• “Radio?” RADIO SUBMENU
• “Lighting?” LIGHTING SUBMENU
• “Off Road?” OFF ROAD SUBMENU
• “Other?” OTHER SUBMENU
• “Marry?” Marry to access the submenus, then one-touch
“Unmarry?” Unmarry function returns to stock
• “TZJL: x.x.x.”display rmware version
• “UnmryNo: xxxx” display Unmarry Number (ignore this
unless instructed not to by support)
• “Full Reboot” reset vehicle modules and UConnect
system.
Main Menu

3
List of Live Functions
(ENGINE ON)
• “Tire” calibrate speedometer for non-factory tire sizes
• “GrRatio” calibrate speedometer for non-factory gear
• “4 Low” change the Transfer Case LOW ratio ratios
Performance Submenu
• “TPMS” disable Tire Pressure Monitoring System
warnings
• “PSI Front/Back” change the TPMS warning pressures
Tire Submenu
• “Cam En” enable/disable the factory backup camera
• “CargoCam” enable aux video/audio for front camera
and/or external video source (8.4” UConnect only)
• “DVD_CD” enable/disable radio’s CD audio input
• “TravelLnk” enable/disable SiriusXM TravelLink
• “OffRdPgs” activate Offroad Pages (8.4” UConnect only)
Radio Submenu
• “DRLType” choose full-time (Canada) or toggled (USA)
DRLs
• “DRL Loc” set DRL location - choices:
DRL
Turns
Fogs
High beams
Low beams
• “DRL Drop” disable Daytime Running Light Dropout (DRL
shut-off while turn signal is on)
• “Fogs En” enable/disable factory fog lights
• “Fog Drop” enable/disable Fog Light Dropout (fog light
shut-off while high beams are on)
• “OneTouch” enable/disable one-touch lane change
• “Halo En” enable/disable factory halos
• “LED Heads” congure vehicle for LED headlights
• “LED FOGS” congure vehicle for LED fog lights
• “LED Tails” congure vehicle for LED tail lights
(aftermarket lights may require a resistor harness)
• “Tail” congure taillights for overseas conversion
• “LED FTrn” congure vehicle for LED front turn signals
(aftermarket lights may require a resistor harness)
• “AutoHiBm” enable/disable factory automatic high beams
• “TRLR Tow” congure vehicle for the Trailer Tow package
Lighting Submenu
• “SwayBar” delete electronic sway bar warnings after removal
• “EPSteer” congure vehicle for hydraulic steering pump
• “TrlrBrk” congure vehicle for MOPAR trailer brake controller
• “Locker” delete factory axle lockers
• “FrtAxl” delete factory Front Axle Disconnect after axle swap
• “DTCM” declare presence of DTCM (Rubicon transfer case)
Off-Road Submenu
• “AUX” enable/disable AUX button package
• “BlindSpot” enable/disable blind spot detection package
• “BeltDing” enable/disable seatbelt ding
• “ParkSense” change ParkSense calibration or disable
• “Splash” change EVIC splash screen
• “DualZone” congure vehicle for single/dual zone center stack
• “HomeLink” enable/disable factory HomeLink visor and harness
• “Paddles” enable support of added factory paddle shifters
• “DimMirror” enable/disale factory auto-dim mirror
• “ProxEntry” enable/disale factory proximity entry
handles and harness
• “Bed115v” enable/disable pickup bed outlet (Gladiator)
• “AutoHL” enable/disable factory automatic headlight assembly
• “PanicBtn” enable/disable keyfob Panic button
• “SGW” enable/disable access to the security gateway
Other Submenu
• “LightShow?” activate Light Show
• “Live Settings?” LIVE SETTINGS SUBMENU
• “Winch XXXX” dene Winch Mode RPM (excl. 4XE)
• “TireFill?” ash to indicate pressure while lling tires
• “DarkMode?” turn off exterior lights and dash/radio/
shifter lights while parked with the engine running
• “Video?” cycle cameras/video inputs
• “VAC” display Vacuum/Boost Gauge
• “0-30/0-60 timer” display 0-30 or 0-60 times on
EVIC display
• “ForceRWD” force RWD or AWD (392 only)
LIVE Main Menu

4
List of “Non-Menu” Live Functions
(NOT IN A MENU — AUTOMATIC OR
ACTIVATED WITH BUTTON INPUTS ONLY)
• activate Light Show (shortcuts)
• AutoTracKill – automatically remember the last
state of the traction control system and set it for you
the next time you start the vehicle
• disconnect sway bar in 2WD up to 30mph or at any
speed if mapped to a button
• License Plate Blanking - automatically turn off
license plate light when in reverse or using TurnCam
to reduce glare
• activate bed lights/reverse lights from keyfob
(Gladiator)
• engage lockers in 2WD and 4Hi on demand
(Rubicon, Mojave)
• Cooldown Mode – turn on engine fans on-demand
with or without the engine running
• Winch Mode – raise idle RPM to user-selected value
between 1250 and 2000 (excl. 4XE)
• Hood Alarm – monitor hood when alarm is armed to
sound the alarm and ash a light show if opened
• Line Lock – use ABS solenoids to lock the front
wheels for burnouts at the track or just for fun (AWD
forced off during use)
• Rock Crawl – lock all four brakes with a steering
wheel button combo to hold the vehicle still,
especially helpful when off-road (excl. 4XE)
• Anchor Mode – lock all four brakes in park to
anchor Jeep (excl. 4XE)
• TC Kill – turn off traction control, stability control
and ABS (excl. 4XE)
• use backup camera and added cargo/front camera
or media player at any speed with a button shortcut
• Turn Assist – lock the inside back tire for sharper
turns (button remap function only) (excl. 4XE)
• remap cruise +/-/RES buttons to:
Any of the 8 light shows
rear camera
TC Kill (excl. 4XE)
Line Lock (excl. 4XE)
Rock Crawl (excl. 4XE)
Turn Assist (excl. 4XE)
Winch Mode (excl. 4XE)
Cooldown Mode
front/rear/front+rear lockers
SwayKill
Dark Mode
Force RWD
• Partial Reboot
• “PIN Lock” assign a steering wheel button
sequence to be required before driving the vehicle
• “BrakeHold” automatically hold brakes at a red light
• “HomeLnkExt” use garage door opener after
shutdown
• “InMoNav” allow navigation entry in motion
• “TurnCam” activate rear camera while
signalling (5, 7, 8.4” UConnect)
• “Kill3Honk” disable honks when leaving running
vehicle wvith the keys (driver door only for now)
• “AP Kill” disable AutoPark system
• “HoodAlarm” toggle hood alarm
• “AutoPassHt” enable passenger side heat on remote start
• “PlsBrk” and “PlsBrkNum” enable and customize
third brake light ash pattern
LIVE Settings Submenu
5
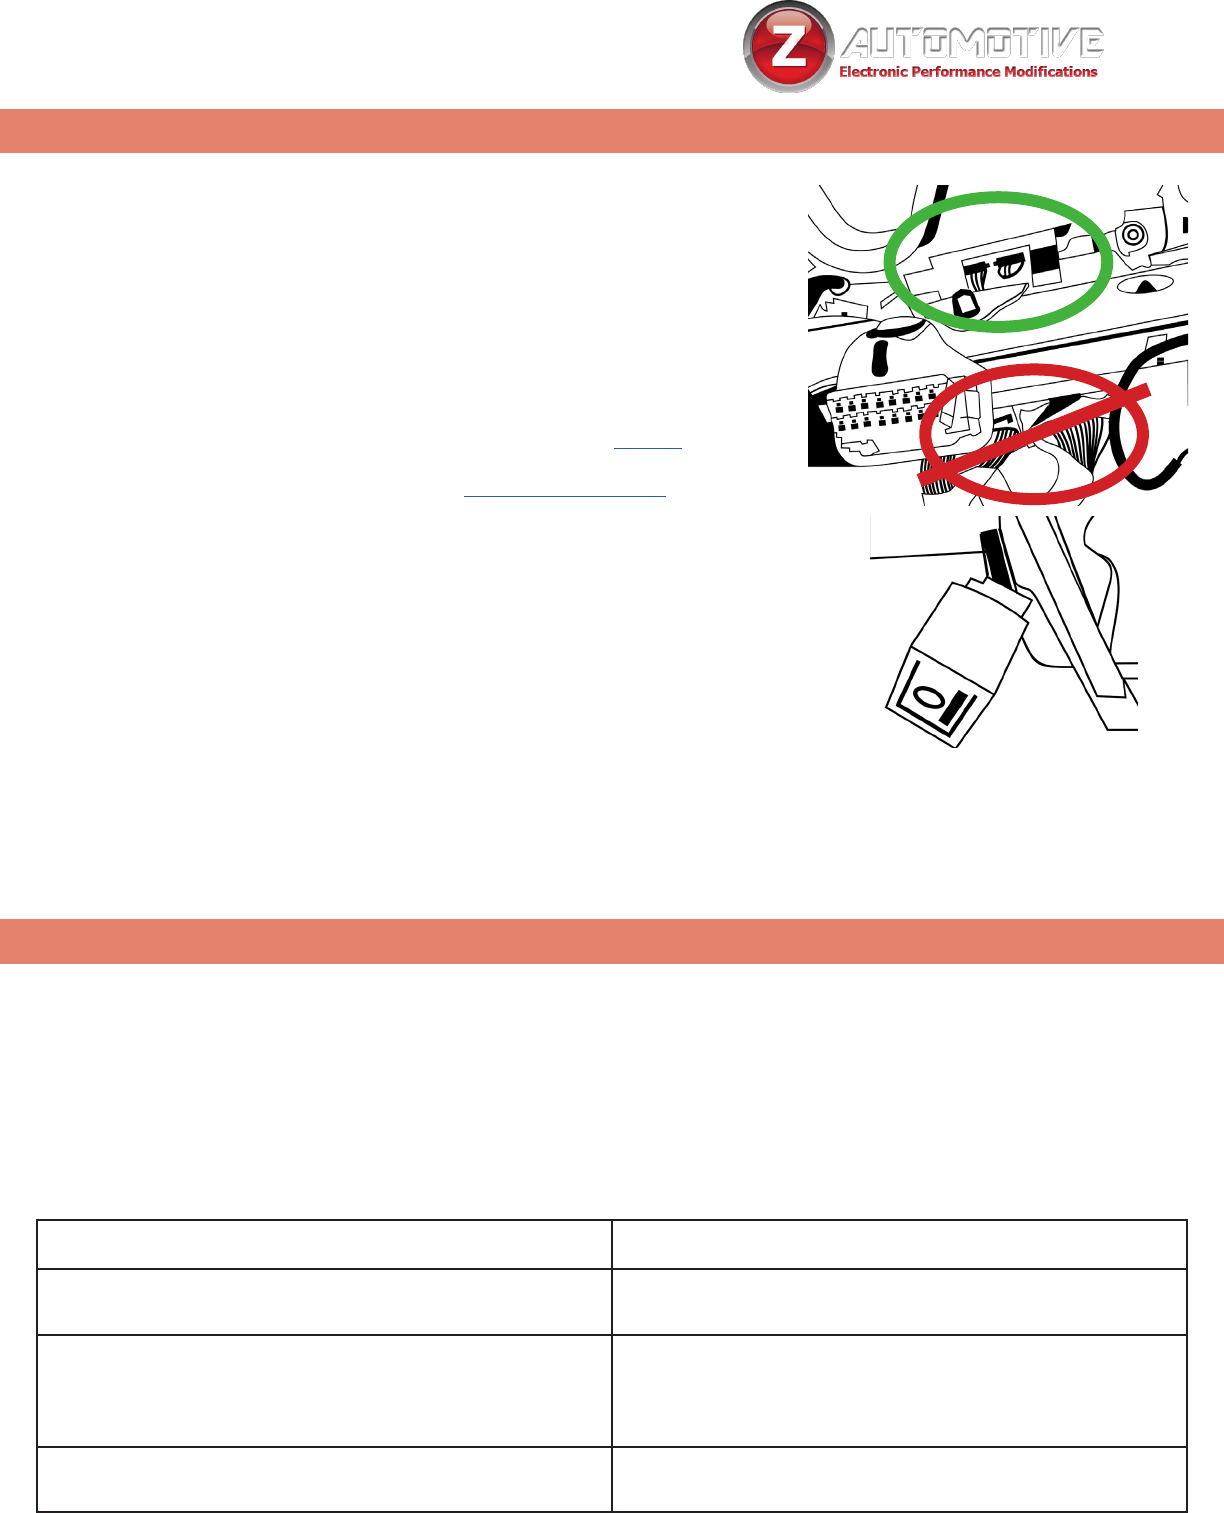
Installation
• Unplug the two SGW
connectors circled in
green by pressing the
tab with your index nger
and gently pulling straight
down on the wires.
• Plug those two connectors
into the Tazer JL Mini.
• The driver knee panel
may be removed for
easier access to see the
connectors
• The Tazer JL Mini can
be left plugged in, as
many of its features (Live
Functions) only work
when plugged in.
• An optional SGW
Extension Cable is
available from our website
for easier removal.
• The Tazer JL Mini will go
to sleep 30 seconds after
the Jeep shuts down.
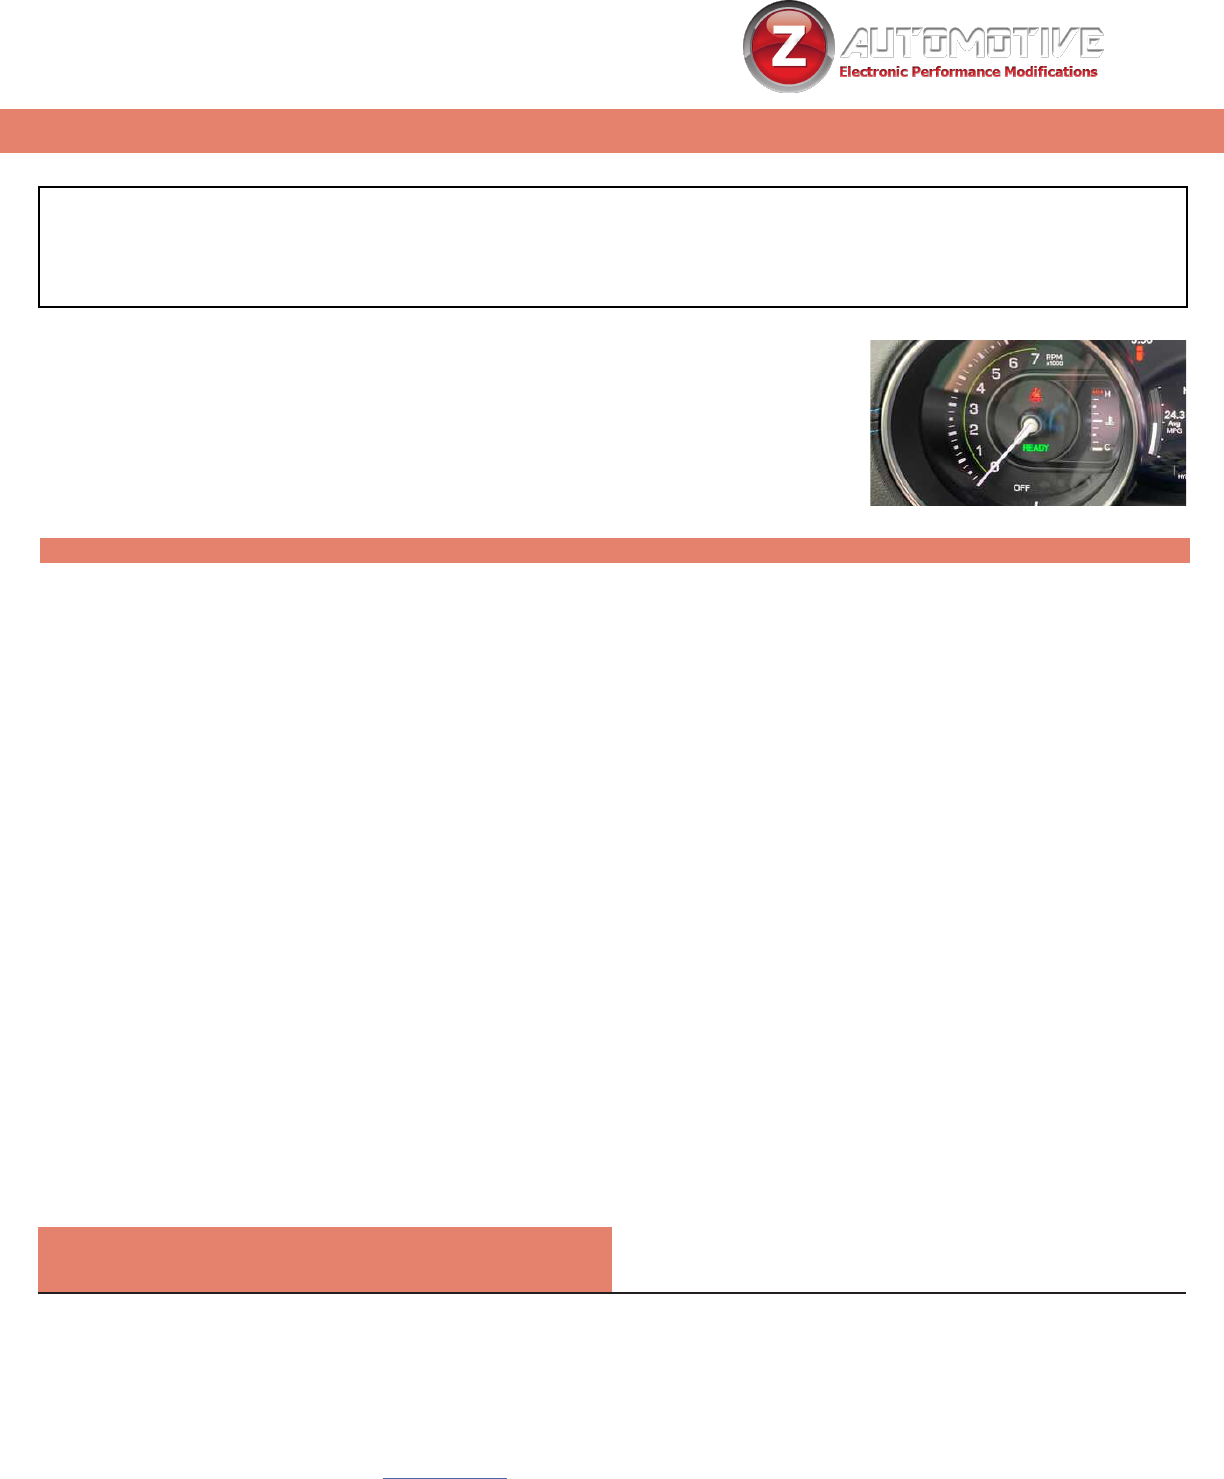
• For all functions involving the dash (EVIC)
display, the EVIC screen rst needs to be
in a state where it’s showing the AUDIO
screen. Navigate to this screen using the
steering wheel arrow buttons.
• Once the display is in this state, use the
button commands below to operate your
Tazer JL Mini.
Menu Navigation
Function
Button Input
OPEN MENU/SCROLL MENU
◁ (HOLD) + CRUISE CANC
SELECT/CHANGE OPTION
or
SAVE VALUE (TIRE SIZE, TPMS THRESHOLD, ETC.)
◁ (HOLD) + CRUISE ON/OFF
ADJUST VALUE (TIRE SIZE, TPMS THRESHOLD, ETC.)
◁ (HOLD) + CRUISE +/-
The Tazer JL Mini ts ALLALL Jeep JLs, JTs and 4XEs. If it looks like one of
the plugs is too big, you’re looking at the incorrect plugsyou’re looking at the incorrect plugs (circled in red).
6
Read everything on this page CLOSELY.
CRITICALCRITICAL
EVERY SINGLE TIMEEVERY SINGLE TIME YOU MAKE CHANGES IN THE “VEHICLE SETTINGS”
(ENGINE OFF) MENU OROR UNMARRY, YOU MUST PERFORM A FULL REBOOT AND TWO YOU MUST PERFORM A FULL REBOOT AND TWO
SLEEP CYCLES.SLEEP CYCLES. THIS PROCESS IS EXPLAINED HERE:
*Your Tazer stores the conguration present when it’s Married. That will be what
it returns to when you Unmarry, even if it wasn’t stock.
SELECT “UNMARRY?”“UNMARRY?” FROM THE VEHICLE SETTINGS MENU AND PERFORM THE AND PERFORM THE
STEPS ABOVESTEPS ABOVE TO RETURN YOUR VEHICLE TO STOCK CONFIGURATION*TO RETURN YOUR VEHICLE TO STOCK CONFIGURATION*
Returning to Stock (Unmarry)
You should Unmarry and remove your Tazer before dealer service You should Unmarry and remove your Tazer before dealer service
or if you wish to use your Tazer in another vehicle. or if you wish to use your Tazer in another vehicle.
Full Reboots should be performed on level ground, with the wheels Full Reboots should be performed on level ground, with the wheels
straight and with your foot off the brakes.straight and with your foot off the brakes.
• After making all of your changes, scroll to “full reboot?” and select it.
• Wait for the countdown, then perform two sleep cycles.
• The quickest way to do two sleep cycles is to turn the ignition off, open and
close the driver’s door and wait about 60 seconds AFTER the dash goes dark,
then turn the ignition on (but not the engine) and repeat once more.
• This step is critical after changing settings or settings might not save, or you
may nd that the dash doesn’t shut down, which can result in a dead battery.
How to perform a FULL REBOOT AND TWO SLEEP CYCLES
7
Vehicle Settings
This section explains the Vehicle Settings, used primarily
for feature activation.
The Vehicle Settings menu is accessed with the ignition in “Run” (not
“ACC”) and the engine NOT running.
The menu items are listed in the order in which they will display.
• Light Shows “LightShow?”: Activate pre-
programmed and custom light shows, even when the
engine isn’t running.
• Read DTCs: View any error codes in the
Powertrain Control Module (PCM)
Body Control Module (BCM)
Transmission Control Module (TCM)
Anti-lock Brake System (ABS)
Drivetrain Control Module (DTCM)
Radio Frequency Hub (RFH)
Drive Assistance Module (DASM)
Occupant Restraint Controller (ORC)
ParkTronic System (PTS)
• Clear DTCs: Clear any error codes in those same
systems
• “Marry”: To advance to any of the vehicle settings,
you will rst need to “Marry” the Tazer to the vehicle.
When you select this option, the Tazer will download your
car’s current (presumably stock) settings. This should
take around 15 seconds. Do not disturb this process.
This option will change to “Unmarry” once Married.
See the previous page for details.
• Submenus: Once married, you can advance though
several sub-menus. Select a submenu using the method
described above. Submenus and their contents are
listed starting on the next page.
“Perf?” PERFORMANCE SUBMENU
“Tire?” TIRE SUBMENU
“Radio?” RADIO SUBMENU
“Light?” LIGHTING SUBMENU
“Offroad?” OFFROAD SUBMENU
“Other?” OTHER SUBMENU
• Firmware Version Display “TZJL: x.x.x.”:
Shows the current Tazer rmware revision.
• Unmarry Number “UnmryNo: XXXX”: Shows the
current “Unmarry Number” (see page 13).
• Full Reboot “FullReboot?”: This option resets
vehicle modules and the UConnect system twice. The
dash will reset. When nished, the red dash security
dot will turn on. It may turn off or not depending on
the vehicle. This takes 2.5 minutes and should be
performed after any Vehicle Settings are changed.
Follow with two sleep cycles as described on the
previous page.
Main Menu
Perf Submenu “Perf”:
tire and performance-based options
• Set Tire Size “Tire”: This setting will change the
programmed tire diameter. Use the hand-measured
height in inches for accurate sensor readings.
• Set Gear Ratio “GrRatio”: This setting will
change the programmed gear ratio.
• Set Transfer Case LOW Ratio “4 Low”:
This setting will change the programmed 4Lo gear ratio.
NOTE: Use
◁
/BACK(HOLD) + CRUISE+/- to raise or lower
these values and
◁
/BACK(HOLD) + CRUISE On/Off to
save the setting.
NOTE: For these settings, after the required Full Reboot
and two sleep cycles, go for a 20 minute drive, preferably
highway, so that all sensors adjust. This process will assure
that the speedometer and shift points recalibrate.
8
Tire Submenu “Tire”:
TPMS options
• Set TPMS “TPMS”: Change the tire pressure
monitoring system type – good when using drag radials
or winter tires when the sensors aren’t present anyway.
Can be NONE (disabled), BASE (low tire warning only), or
PREMIUM (individual tire pressure).
• Set Tire Pressures Front/Rear “PSI
Front/Back”: This setting changes the TPMS warning
pressures – use
◁
/BACK(HOLD) + CRUISE+/- to raise
or lower the pressure and
◁
/BACK(HOLD) + CRUISE On/Off to save the new
setting. The Jeep’s computer will only recognize a
minimum of 25 PSI.
NOTE: For these settings, after the required Full Reboot
and two sleep cycles, go for a 20 minute drive, preferably
highway, so that all sensors adjust. This process will assure
that the TPMS sensors recalibrate.
Radio Submenu “Radio”:
radio-based options
• Set Backup Camera “Cam En”: This setting
enables a newly-added factory backup camera.
• Set Cargo Cam “CargoCam”: This setting will add
the Cargo Cam selector to the camera view and activate
the input for use with a Z Automotive front camera, AV kit,
OR HDMI-AV Kit. You may only use one.
• Set DVD/CD “DVD_CD”
1
: This setting activates
the CD input on the radio, for use as an aux input,
particularly for the Z Automotive AV or HDMI-AV Kit.
• Set Travel Link “TravelLnk”: This setting adds the
ability to disable SiriusXM Travel Link, which turns off the
weather pop-ups. Also disables SiriusXM Trafc information.
• Offroad Pages “OffRdPgs”: Activate Offroad
Pages after upgrading to an 8.4” radio. Requires a
UConnect rmware from 2019 or later.
Lighting Submenu “Lighting”:
DRL and other lighting options
• Set DRL Type “DRLType”: Choose USA (on but
selectable), Canada (on all the time) or OFF (disabled).
• Set DRL Location “DRL Loc”: Choose which lights
to use as DRLs (results vary with vehicle model) - choices:
DRL
Turns
Fogs
High beams
Low beams
• Set DRL Dropout “DRL Drop”: Set to OFF, this
will keep the DRLs on even when a turn signal is in use.
• Set Fog Lights Enable “Fogs En”: This
setting enables newly-added factory fog lights.
• Set Fog Dropout “Fog Drop”: Set to OFF, this will
keep the fogs on even when the high beams are in use.
• One-touch “OneTouch” enable/disable one-touch
lane change
• Set Halo Enable “Halo En” enable/disable
factory halos
• Set LED Headlights “LED Heads” congure
vehicle for LED headlights
• Set LED Fogs “LED FOGS” congure vehicle for
LED fog lights
• Set LED Tails “LED Tails” congure vehicle for LED
tail lights (aftermarket lights may require a resistor harness)
• Taillight Type “Tail” congure taillights for
overseas conversion (If you are unable to restore the
default value, you should Unmarry as described on
page 6 to return to stock.)
• Set LED Front Turn “LED FTrn” congure
vehicle for LED front turn signals
NOTE: For this setting, after the required Full Reboot and
two sleep cycles, run each blinker for 20 seconds each.
If this does not clear hyperash and you have aftermarket
lights, your lights might require a resistor harness.
• Set Trailer Tow “TRLR Tow”: Congure the
vehicle for MOPAR trailer towing wiring kit

9
Offroad Submenu “Offroad”:
offroad-related options
• Set Sway Bar “SwayBar”: Set to YES, this deletes
the warnings after the Electronic Sway Bar has been
removed
• Set EPSteer “EPSteer”: This setting is used if
you deleted the factory electronic steering pump for a
hydraulic pump.
• Trailer Brake “TrlrBrk”: This setting will activate a
MOPAR trailer brake controller.
• Set LOCKER “Locker”: This setting is used if you
deleted the factory axle lockers. You can delete front
only, or both. If the front locker is deleted then the front
axle disconnect is deleted and needs to be disabled as
well.
• Set Front Axle Disconnect “FrtAxl”: This
setting will delete the factory Front Axle Disconnect for
those that have done axle swaps.
• DTCM “DTCM”: Declare the presence of a Drive Train
Control Module (Rubicon Transfer Case)
Other Submenu “Other”:
additional vehicle settings
• Set AUX
“AUX”: Set to YES, this congures the
vehicle for the AUX button package.
• Set Blind Spot “BlindSpot”: Set to YES, this
congures the vehicle for the AUX button package.
• Set Seatbelt Ding “BeltDing”
1
: Set to OFF,
this will disable the chime when your seatbelt is off. The
seat belt warnings on the dash will continue to function.
Always wear your seatbelt.
• Set ParkSense “ParkSense”: This setting is to
change or disable ParkSense system. Choices are as
follows:
0: None
1: Sahara
2: Rubicon
• Set Splash “Splash”: With this setting you can
choose the cluster splash screen.
For Wranglers:
Sport
Sahara
Rubicon
For Gladiators:
Sport
SportX
Rubicon
• Set DualZone “DualZone”: This setting allows the
use of the single zone or dual zone center stack button
assembly. Useful when upgrading from a 5” radio to 7 or
8.4, and swapping in the dual zone controls that come
with volume knobs. Note: the system will still be single
zone in this case, only the driver controls will change the
temperature.
• Set HomeLink
“HomeLink”: Set to YES, this
enables the factory HomeLink visor and harness.
• Set Paddle Shifters “Paddles”: Set this to ON
after adding factory paddle shifters.
• Auto Dim Mirror
“DimMirror”: Set to YES, this
enables the factory auto-dim mirror
• Set Proximity Entry
“ProxEntry”: Set to YES,
this enables the factory proximity entry handles and
harnesses
• Bed 115v
“Bed115v”: Set to YES, this enables the
pickup bed outlet (Gladiator)
• Set Auto Headlights
“AutoHL”: Set to YES, this
enables the factory automatic headlight assembly
• Set Panic
“PanicBtn”: Set to NO, this disables the
PANIC button on the keyfob. This needs to be set to ON
for the Hood Alarm feature to work.
• SGW Lock
“SGW”: Set to NO, this allows access
through the security gateway for dealer tools. Use
this feature only if you know your dealer doesn’t mind
aftermarket mods. Otherwise, you should Unmarry and
remove the Tazer before dealer service.
10
Live Menu Settings
This section explains the Tazer’s Live Settings – these are
activated with the same button presses as the Vehicle Setting, but while the engine
is RUNNING*. These features will only work if the Tazer remains plugged in.
• Light Show “LightShow?”: This is one method of
activating the light shows. Selecting this will activate the
rst show, unless ZPU was used to change the startup
show. There are 9 light shows – you can toggle through
all 9, then back to OFF.
• Live Settings “LiveSettings?”: Select this to
enter the Live Settings submenu which includes the the
adjustable options listed in the next section.
• Winch RPM “Winch XXXX”: Select this option
with
◁
/BACK(HOLD) + CRUISE ON/OFF then use
◁
/
BACK(HOLD) + CRUISE +/- to adjust the Winch Mode
RPMs between 1300 and 2000. Use
◁
/BACK(HOLD) +
CRUISE ON/OFF to save the setting. (excl. 4XE)
• TireFill “TireFill?”: Set the PSI with
◁
/BACK(HOLD)
+ CRUISE +/- and the marker lights near each tire will
• ash slowly if underlled
• ash quickly if overlled
• remain solid at the correct pressure
• Dark Mode “DarkMode?”: Set to ON, this will
turn off vehicle lights. Advance to the next menu item,
press “Screen Off,” or drive over 5 mph to cancel this
mode.
• Set Video “Video?”
1
: Select to cycle between
camera and video inputs.
• VAC or BOOST: Choose VAC or BOOST to display
that gauge on the EVIC screen.
• 0-30 Timer “0-30”: Select this option with the
vehicle stopped and the display will change to “start 30.”
As soon as the vehicle starts moving, the display will
change to “go to 30” and the timer will start. When the
vehicle reaches 30MPH, the time will be displayed.
• 0-60 Timer “0-60”: Select this option with the
vehicle stopped and the display will change to “start 60.”
As soon as the vehicle starts moving, the display will
change to “go to 60” and the timer will start. When the
vehicle reaches 60MPH, the time will be displayed.
• Force RWD “ForceRWD” (392): Select Normal,
Force RWD or Force AWD. You can change the setting at
any time, but the change will only occur when the car is
not in motion.
• Display Tazer Firmware Revision: Displays
the Tazer’s current rmware version: “TZJL: x.x.x.”
(ie “TZJL: 11.4.0”)
Main Menu
Live Settings Submenu:
adjustable LIVE options
• PIN Lock “Set Pin?/Clear Pin?”: This allows
you to set a steering wheel button sequence which
will be required for an operator to drive the vehicle.
This is a complex security feature, requiring its own
supplemental intruction sheet on page 13.
• Brake Hold “BrakeHold”: Set to ON, this will
automatically hold your brakes after pressing the brake
rmly for 2 seconds under these circumstances:
• not in a Tazer dashboard menu
• at a full stop
• your seatbelt is on
• in drive
* the 4XE will also access the Live Menu with the ignition in
RUN and the tachyometer at 0
NOTE: When using TurnCam or the Mute shortcut, avoid turning the camera
off using the on-screen “X.” Instead, wait for the TurnCam to turn off after your
signal or use the Mute shortcut again to turn the camera off.
11
Non-Menu Live Functions
Some live functions of the Tazer JL Mini are not accessed via a menu, but rather
work automatically or with button presses.
• Homelink EXT “HomeLnkExt”: This will keep the
garage door opener powered after vehicle is shut off. Options are:
Off
IGN - for 30 seconds after shutdown
DOOR - for 30 seconds after shutdown or while
door is open with alarm disarmed
• Set In-Motion Nav “InMoNav”: Set to ON, this
allows address entry while the vehicle is in motion. This
is for PASSENGER use. It may be illegal for the driver
to manipulate the navigation system while driving. It is
recommended to leave this setting OFF, enabling it only
when you need to use it. This will automatically be
disabled if TurnCAM is enabled.
• “TurnCam”: Set to yes, this will automatically turn
on the backup camera if the turn signals are being used.
This will automatically be disabled if In-Motion Nav is
enabled. Settings are:
Off
5/7 - for 5” or 7” UConnect radio
8.4 - for 8.4” UConnect radio
• “Kill3Honk”: Set to yes, this will disable the honks
that sound when leaving the running vehicle with
the keys (driver door only for now)
• AutoPark Kill “AP Kill”: Set to yes, this will
automatically disable the AutoPark feature when the
vehicle is turned on and foot is on the brake. For safety,
this will be disabled past 30mph and will reenable when
the vehicle is put in Park.
• “HoodAlarm”: Set to ON, this will start an alarm
and Light Show when the hood is opened. Turn off by
starting or unlocking the vehicle or with the Panic button.
(requires that Set Panic is enabled)
• “AutoPassHeat”: Set to ON, this will activate the
passenger seat warmer when Auto-On Heat is enabled.
• Pulse Brake Speed “PlsBrk”: Choose an
option to enable and set the third brake light pulse
speed.
• Pulse Brake Number “PlsBrkNum”: Set the
number of brake light ashes.
• Light Show From Keyfob: The Tazer JL Mini
has two button shortcuts to start Light Shows. Those are:
Keyfob: Press UNLOCK, UNLOCK, LOCK, UNLOCK
on the keyfob to start the rst light show in
the sequence (depending on which show it’s
congured to start with). Pressing unlock again
will advance to the next enabled show. Pressing
lock will turn off the light shows. You may lock
the vehicle while the shows are on by pressing the
button on the door handle or using the key.
Adaptive Cruise buttons: See the button remap
instructions below. Press the remapped button to
turn the Light Show on or off.
The light show will shut off if it’s used for such a long
time that the vehicle battery voltage drops below 11V.
• Stop/Start Kill: The Tazer JL Mini will
automatically remember the On/Off state of the Auto
Stop/Start button when you turn the vehicle off.
• Traction Kill: The Tazer JL Mini will automatically
remember the Enabled/Disabled system when you turn
the vehicle off.
• Bed/Reverse Lights from Keyfob: Use
the following keyfob shortcuts to turn on the bed and
reverse lights:
• UNLOCK x3 - Turn on Bed Lights
• UNLOCK x5 - Turn on Bed Lights + Reverse Lights
• LOCK - Turn off the lights (lights will also turn
off after 30 minutes)
Continued...

12
• License Plate Blanking: The license plate
lights will automatically turn off when in reverse or using
TurnCam to remove glare on the camera at night.
• Sway Bar in 2WD: Press SWAY BAR while in
2WD and it will disconnect or re-connect as if it were in
4WD. It will a utomatically re-connect at 30MPH and
disconnect when the Jeep comes back to a full stop.
See “SwayKill” in Button Remap section for full sway bar
control.
• Locker Control: While stopped, press REAR
ONLY in 2WD/4HI or FRONT+REAR in 4HI and lockers
will engage. Press OFF to disengage lockers. This is the
same method used to operate the lockers in 4LO. See
LOCKERS in Button Remap section for full locker control.
• Cooldown Mode: Press
▷
+ CRUISE CANCEL to
turn the engine fans on High. Press again to turn them off.
NOTE: When the engine is off, the fans will turn off
automatically if the battery drops to 11V.
NOTE: The transmission temperature will read as 229F
while this mode is being used with the engine running.
NOTE: Only works with the engine OFF on manual Jeeps
• Winch Mode: Press
◁
/BACK(HOLD) + CRUISE
RES to raise the idle RPMs to the value selected in the live
menu (default 2000). There may be a few-second delay
before it changes. Touching the accelerator will cancel
Winch Mode.
• Anchor Mode (excl. 4XE): This feature locks all
four brakes until the accelerator is pressed. To activate,
BRAKE FIRMLY + PULL HI-BEAM STALK. This works in
conjunction with Winch and Cooldown Modes.
• Line Lock (excl. 4XE): While in 2WD and at a full
stop, press
◁
/BACK(HOLD) + CRUISE+ buttons. Once
the ABS and Brake lights on the dash begin to ash,
continue to hold the buttons and pump the brake pedal
twice rmly and release. The Jeep will stay held using only
the front brakes while you press on the accelerator to do
a burnout. “LineLock” will be displayed in the cluster. This
will automatically force RWD on 392.
• Rock Crawl (excl. 4XE): This feature holds all
four brakes while you work the pedals to apply torque.
Press and hold
◁
/BACK(HOLD) + CRUISE- and pump
the brakes twice. Once “RockCrawl” shows on the EVIC,
release the buttons when you’re ready to start moving.
• Full traction control disable (excl. 4XE):
PRESS AND HOLD THE TRACTION BUTTON FOR 5
SECONDS to fully disable TC and ABS. Shut off and
restart the Jeep to reenable. This will force the 392 into
2WD. Tap again to restore 4WD.
• Set Camera: Rather than using the menu to cycle
cameras and video inputs, they can also be cycled by
quickly tapping the radio MUTE button twice.
• Turn Assist (excl. 4XE) (button remap ONLY):
TURN THE WHEEL, THEN PRESS THE REMAPPED
BUTTON to lock the inside back tire for sharper turns.
• Button Remap: HOLD Right Arrow (
▷
) and TAP
the desired button to map a hotkey function to it. You can use
the Cruise +, -, and RES buttons. Simply TAP the remapped
button alone to use the function. The choices are:
• Any of the 8 light shows
• rear camera
• TC Kill (excl. 4XE)
• Line Lock (excl. 4XE)
• Rock Crawl (excl. 4XE)
• Winch Mode (excl. 4XE)
• Cooldown Mode
• Front/Rear/Front+Rear Lockers
• SwayKill
• Dark Mode
• Force RWD
Keep in mind that not all functions pertain to all vehicles.
• Partial Reboot: Press
◁
/BACK(HOLD) + CRUISE RES with the ignition
engine OFF and the ignition in RUN to reset several
systems including the PCM (engine adaptives), RF Hub,
Instrument cluster, ABS, BCM.
NOTE: When using TurnCam or the Mute shortcut, avoid turning the camera
off using the on-screen “X.” Instead, wait for the TurnCam to turn off after your
signal or use the Mute shortcut again to turn the camera off.

13
PIN Lock Supplement
These supplemental instructions apply to
all vehicles equipped with:
Firmware 18.1.7-111422 or newerFirmware 11.4.1-111422 or newer
Firmware 2.5.6-111422 or newer
The Tazer PIN Lock allows you to set a steering
wheel button sequence (PIN) that must be entered before
the vehicle can be driven. This is the most complex feature of
the Tazer and provides a high level of security against vehicle
theft. This PIN will need to be entered when the vehicle is
started or after you exit the running vehicle with your key.
Select the “Set PIN?” option in the Live Settings menu with
◁
/BACK(HOLD) + CRUISE On/Off to begin this process.
Setting your PIN:
After selecting “Set PIN?” from the menu, you will be prompted
to enter a one to six button sequence that will allow the
operator to drive the vehicle. Your button choices are:
• Cruise + (+)
• Cruise - (-)
• Cruise Cancel (<)
• Cruise RES (>)
and if you have Adaptive Cruise Control
• Near ACC (N)
• Far ACC (F)
• ACC Enable (A)
Hitting a seventh button will abort the process. Save your
PIN with CRUISE On/Off.
After turning the vehicle off, this PIN will now be required to drive
the vehicle and “Set PIN?” will change to “Clear PIN.”
After turning the vehicle on:
1. a 20-second countdown will begin
2. the green parking light icon will blink
3. the dashboard turn indicators will blink and click
Enter your PIN and the countdown will stop. The dashboard
screen will read “PIN Unlocked.”
Failure to enter the PIN before the countdown ends will
cause the ABS pump to lock all four brakes while the interior
ABS light ashes. This is to remind you to enter the PIN and
will not bring attention to the vehicle.
Shifting into gear without entering the PIN will lock the
brakes, in addition to starting a Light Show. You will not be
able to move the vehicle until you enter the PIN, after which
this will stop.
Carjack Mode:
When the vehicle is running and you leave the vehicle with
the key and close the door, the vehicle will continue to be
fully operable for 20 seconds.
If the PIN is not entered within those 20 seconds:
If the vehicle is stopped, the brakes will lock. Attempting to
shift into gear from this state will trigger a Light Show.
If the vehicle is in motion, once it slows to 5MPH, the
brakes will jam and a Light Show will begin. This will render
the vehicle immobile until the PIN is entered.
Clearing the PIN:
To remove the PIN Lock, select “Clear PIN.” If the PIN was
entered when starting the vehicle, this will immediately
remove the PIN Lock.
Forgetting your PIN:
To remove the PIN Lock after the PIN Lock is triggered,
select “Clear PIN” from the menu. The dash screen will read
“Brake+Hazard.”
Turn on your hazard lights and apply the foot brake. This will
trigger a 10-minute countdown. Keep the vehicle running
and your foot on the brake until this countdown is nished
and the PIN Lock will be removed.
NOTE: In any instance that the vehicle is immobilized by the Pin Lock feature, in the Wrangler 4XE, the motor will
shut off and the vehicle will become stuck in Park instead of locking all four brakes.
NOTE: For best results, stow the Tazer in a place where it is not likely to be removed intentionally or accidentally.
14
UNMARRYING YOUR TAZER
To Unmarry your Tazer, select “Unmarry” from the Vehicle Settings
Menu (not Live). Then perform a “Full Reboot” and two sleep cycles
as described on page 6. All of your settings will revert to whatever
they were when you originally Married your Tazer.
You should Unmarry and remove your Tazer before dealer service
or if you wish to use your Tazer in another vehicle.
If you receive a Tazer second-hand, or lose access to your vehicle without unmarrying your Tazer and
receive the “Not VIN XXXX” error:
1. Navigate to the “UnmryNo” item in the Tazer’s EVIC menu, described on page 7.
2. Write this key down, and visit this URL to purchase our Unmarry Service, where you’ll be prompted to
enter that key: https://www.zautomotive.com/product/unmarry-key/
3. Return to the UM Key option in the EVIC menu and hit (Left Arrow + Cruise+/-) to begin entering the
code provided with your purchase.
4. Press Left + Cruise On/Off to proceed to the next character.
5. Once you’ve entered the last (eighth) digit, your Tazer will report whether the unmarry has succeeded
or failed.
The Unmarry Key
NOTE: This feature is only for when your
Tazer is Married to another vehicle.
UPDATING/LIGHT SHOW CONFIGURATION
Updating your Tazer rmware is done with the Z Automotive Programming Utility, which requires
a computer or other device running Windows or MacOS Catalina or newer and an available
USB port. The ZPU User Guide at the link above explains how to install ZPU and how to perform
rmware updates. If you misplace or damage your USB cable, you can replace it with any
common “USB Mini B” data/charging cable.
Please see the accompanying “Light Show Conguration Guide” to congure your
Tazer JL Mini’s light show options in ZPU
15
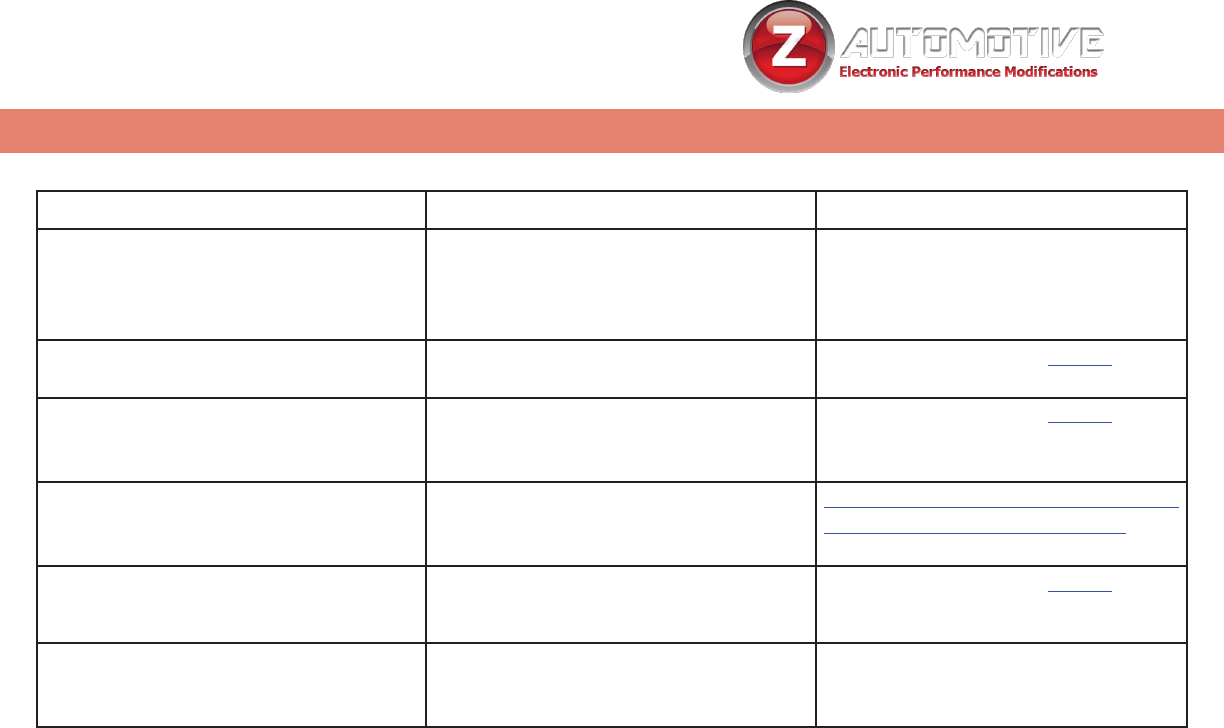
Symptom Cause Solution
No menu in EVIC EVIC display has to be in a
state where it can display
radio station name
Set EVIC so it’s showing radio station
name. This
would be the the “Audio” menu on the
instrument cluster
Changed a setting and it didn’t take
effect
Full Reboot and 2 sleep cycles were not
performed
Follow the directions on page 6.
Changed gear ratio and “service AWD”
is showing
Incorrect gear ratio chosen or Full
Reboot and 2 sleep cycles were not
performed
Follow the directions on page 6 and
go for a short drive to fully initialize.
Manual transmission: changed tire size
and have ESS error/backup camera
stopped working
ESS re-learn procedure not completed. Please see the ESS relearn procedure
on the support page for Tazer JL.
LED Turn signals are hyperashing Needs Full Reboot, 2 sleep cycles and
calibration
Follow the directions on page 6. Then
run each turn signal for 20 seconds.
Red security light on, ignition state
won’t change or vehicle won’t start
Needs time to complete synchronization
routine after conguration change
Wait a few minutes and then try
changing ignition state, then perform
one sleep cycle.
Z Automotive cannot be held responsible misuse or consequential damages.
If you are in doubt, email support@zautotech.com.
Please be aware that modifying your vehicle in any way can affect your vehicle’s warranty, longevity, handling, etc.
Please use with caution, and AT YOUR OWN RISK.
USING THE LIGHT SHOW FEATURE ON PUBLIC ROADS: IMPERSONATING A POLICE OFFICER IS A FELONY. LIGHT
SHOW IS INTENDED FOR CAR SHOW/TRACK/OFF ROAD USE ONLY.
Z Automotive is in no way afliated with FCA.
Protected by US Patents 15/441,476 and 15/441,467
Common Troubleshooting Questions
